I was recently working on a project for our client, Moondance Jewelry, and they needed a way to display certain add-on choices by a taxonomy other than the built-in WooCommerce product category (product_cat). To achieve this, I implemented a custom taxonomy filter, which allowed us to filter products based on additional attributes, providing a more tailored browsing experience for customers. This feature enables users to refine their product selection based on specific criteria, improving usability and enhancing the shopping experience.
Want to bypass the BS and just look at the Gist? Go for it.
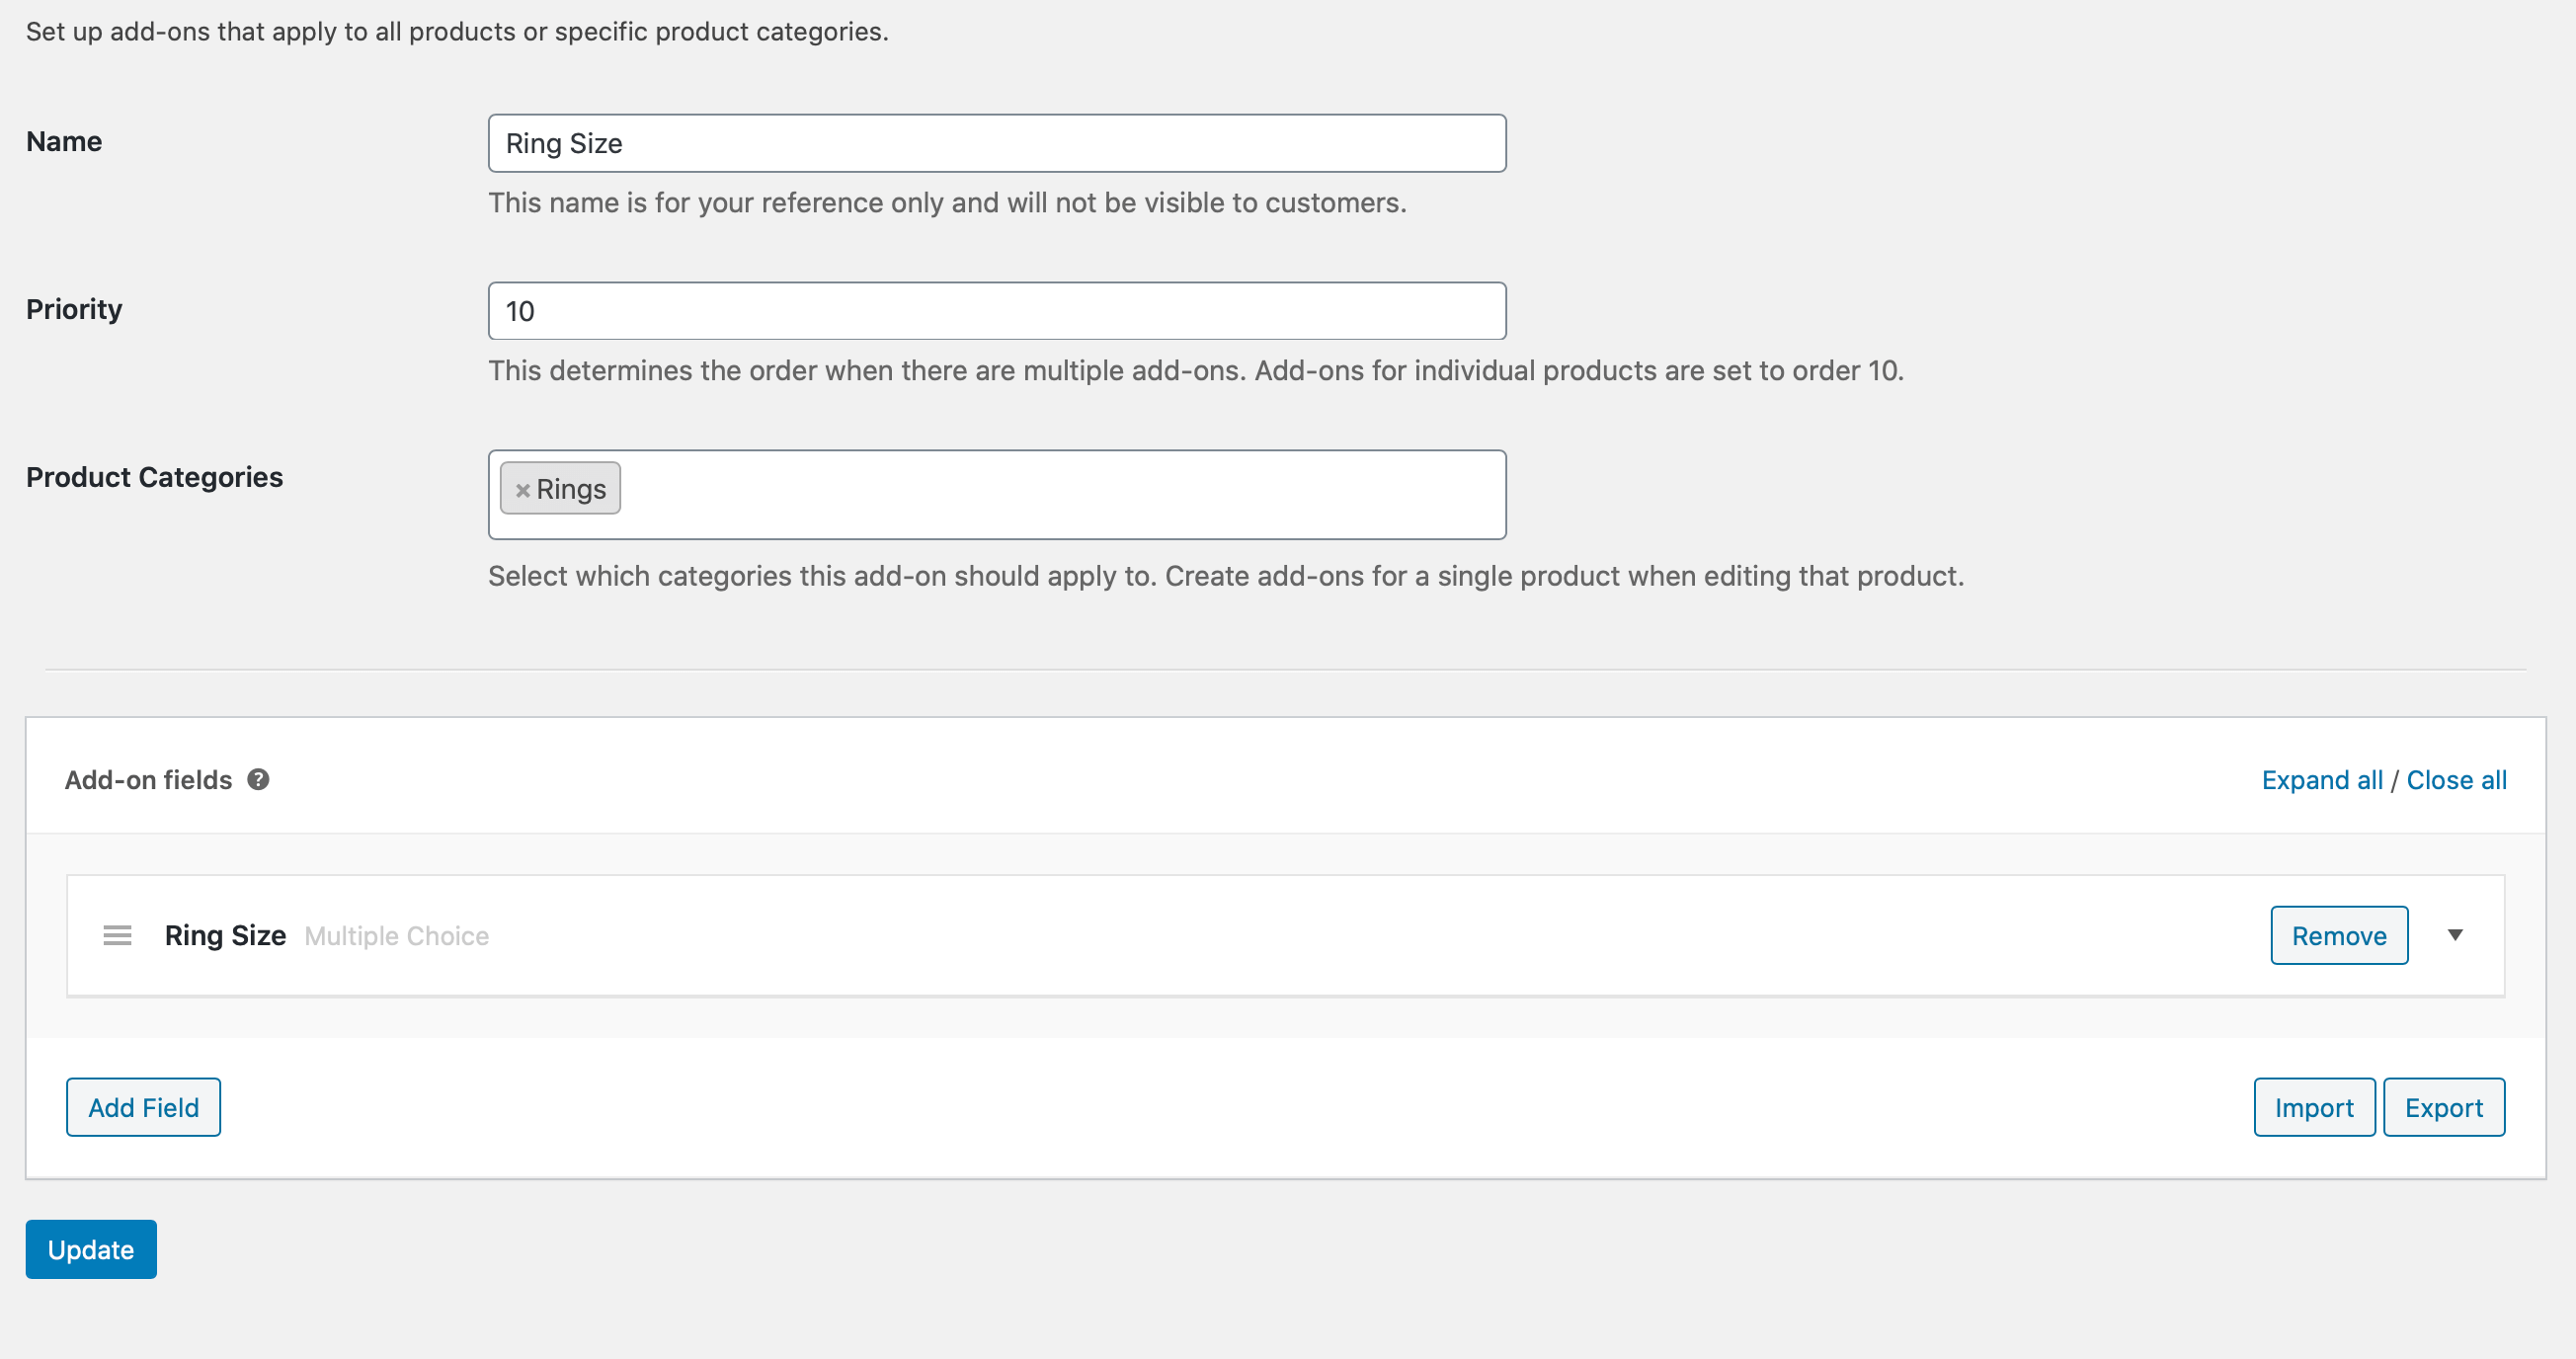
Moondance Jewelry sells hundreds of products online, and many of these products are rings. When you order a ring, you need to indicate your finger size. Originally, we accomplished this with the WooCommerce Product Add-ons plugin, out of the box.
Back-end look at the Ring Size options:
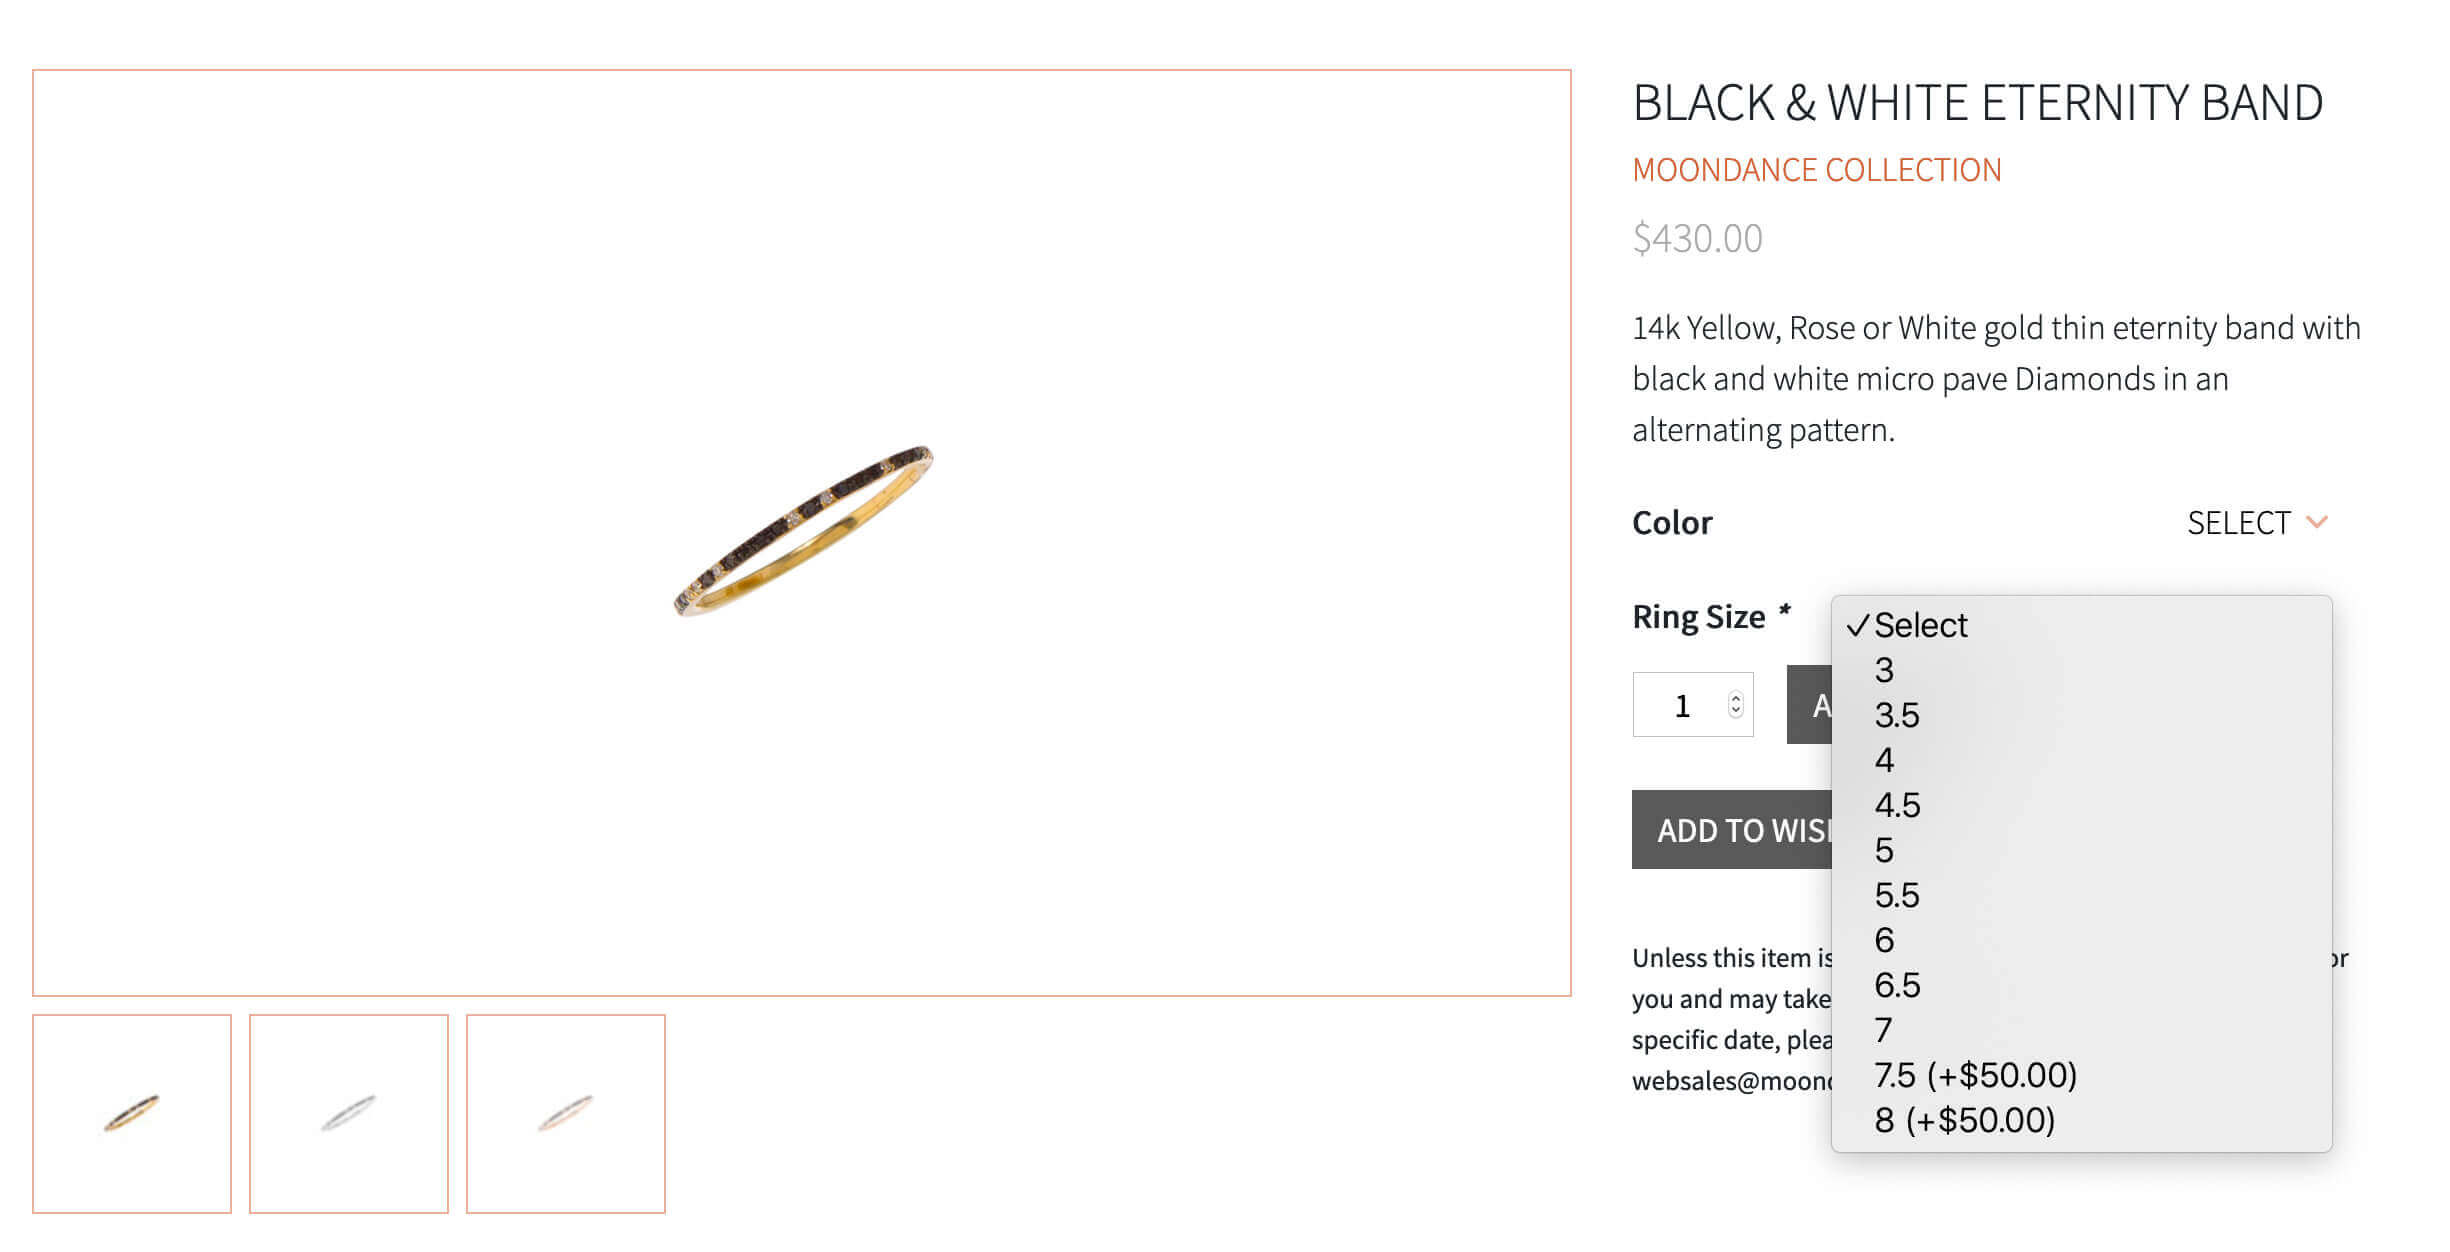
Front-end rendering of the Ring-size choices:
The plugin allows you to refine where the add-on is shown based on product category only. Or you can create add-ons at the product level. Most rings are available in whole and half sizes. However, one designer line only has whole sized rings.
Determining the Solution
At first I thought I’d just run a filter to remove the decimal value sizes for that particular designer, and get on with it. While that would have been faster, it would have been all under the hood code, and difficult for the shop manager to update in the future. So I opted to look for a way to refine by our custom taxonomy filter: Designer (product_brand).
I started sifting through the WooCommerce Product Add-ons code and found a few helpful filters and actions that I started experimenting with. The way the Product Add-ons plugin works is by registering each add-on as a custom post type (global_product_addon). Then, when the product page loads, the plugin looks at the product categories (product_cat) that are attached to the product and runs a WP_Query using get_post() to find the add ons that have similar taxonomy term relationships as the product.
It took me some time to realize that we were going to have to add another select field on the add-ons form to enable the user to choose which Designer the add-on should show up on. The subsequent query for the global_product_addon was going to have to include the extra taxonomy filter and the relation in the query was going to have to be “AND” (not OR).
I considered providing a way to exclude certain terms, but that sort of goes opposite of what the plugin does out of the box and I wasn’t interested in making wholesale changes to this plugin (or re-writing it entirely).
Here are the coding steps it took to add our custom taxonomy filter to the WooCommerce Product Add-ons plugin.
The entire code is located in this gist.
WP Admin Backend
- Add a new field on the add-on editor form
- Write a bit of JS to initialize the select2 that comes with WooCommerce/the plugin
- Save the field’s values upon submission
Add the New Field
Using the action “woocommerce_product_addons_global_edit_objects,” we can change the html on the add-on editor page. I had to think outside the box a bit since this action is called within a table cell. So I had to close the table row and then add just the opening to a new one so the HTML ended up valid:
/**
* Add pick field for Designers to refine Addon location
*
* This is sort of a hack because you need to use the action
* and close the table row, then create another one.
*/
add_action( 'woocommerce_product_addons_global_edit_objects', function( $objects ) {
//Make sure we're on the edit page
if( empty( $_GET['edit'] ) ) {
return;
}
//Load our custom terms for this add-on post object
//use $_GET['edit'] to retrieve our post ID for the add-on post object
$designer_objects = (array) wp_get_post_terms( (int) $_GET['edit'], array( 'product_brand' ), array( 'fields' => 'ids' ) );
?>
</select>
<p class="description"><?php esc_html_e( 'Select which categories this add-on should apply to. Create add-ons for a single product when editing that product.', 'woocommerce-product-addons' ); ?></p>
</td>
</tr>
<tr class="custom-taxonomy-product-brand">
<th>
<label for="addon-objects-product-brand"><?php esc_html_e( 'Designers', 'woocommerce-product-addons' ); ?></label>
</th>
<td>
<select id="addon-objects-product-brand" name="addon-objects-product-brand[]" multiple="multiple" style="width:50%;" data-placeholder="<?php esc_attr_e( 'Choose designers…', 'woocommerce-product-addons' ); ?>" class="wc-enhanced-select-designers wc-pao-enhanced-select">
<option value="all_designers" <?php selected( empty( $designer_objects ), true ); ?>><?php esc_html_e( 'All Designers', 'woocommerce-product-addons' ); ?></option>
<optgroup label="<?php esc_attr_e( 'Designers', 'woocommerce-product-addons' ); ?>">
<?php
$terms = get_terms( 'product_brand', array( 'hide_empty' => 0 ) );
foreach ( $terms as $term ) {
echo '<option value="' . $term->term_id . '" ' . selected( in_array( $term->term_id, $designer_objects ), true, false ) . '>' . $term->name . '</option>';
}
?>
</optgroup>
<?php
}, 10, 1 );
I simply copied the model of the row before, and then tweaked the data that the options were created from.
Initialize select2 and handle the “All Designers” option
Initializing select2 makes our standard HTML select very pretty and more user friendly. The best way I found to plug this into the existing plugin was to write a separate JS file and enqueue.
/**
 *      Queue the script for the custom taxonomy selector
 *
 */

add_action( 'admin_enqueue_scripts',  'admin_settings_mdj_addons_enqueue_scripts');

function admin_settings_mdj_addons_enqueue_scripts() {

    if (
        'product_page_addons' !== get_current_screen()->id &&
        'product'             !== get_current_screen()->id &&
        'shop_order'          !== get_current_screen()->id &&
        'shop_subscription'   !== get_current_screen()->id
    ) {
        return;
    }


     wp_enqueue_script( 'mdj-wc-addons', get_stylesheet_directory_uri() . '/assets/js/mdj-wc-addons.js', array( 'jquery' ), null, true );

}
And here’s the JS file:
jQuery( function( $ ) {

//This is sort of a hack to change the copy in the description field under our new select. There's no good way to filter this in PHP, so since we need to load JS anyway, might as well pretty up the descriptions!
    $('.custom-taxonomy-product-brand .description').text('Select which designers this add-on should apply to. You must make a selection here or this addon will not show up.');


//Initialize the select2
    $( '.wc-enhanced-select-designers' ).select2();

//I built off the code the product add-ons plugin uses to deal with the "All Categories" option. I'm not well versed with Select2, so I just closed my eyes and jumped...
    $( '.wc-enhanced-select-designers' ).on( 'select2:select', function( e ) {
        var selectedID = e.params.data.id,
            values     = $( '.wc-enhanced-select-designers' ).val(),
            all        = 'all_designers',
            allIndex   = values.indexOf( all );


        if ( all === selectedID ) {
            //values = [ all ];
            $('.wc-enhanced-select-designers option' ).prop('selected', 'selected' );
            $('.wc-enhanced-select-designers option[value="all_designers"]' ).removeAttr( 'selected' );

            $('.wc-enhanced-select-designers').trigger('change');
        }


    } );


} );
I realize that this JS leaves out dealing with “removing all” options, but I didn’t really care about that enough to make it work. If it becomes a pain point in the future, I can always revisit.
Save the Values
Since we’re working with a post type for the product add-on object, saving terms is pretty trivial. Luckily, there’s an action that fires during the save routine of the plugin that we can use.
/**
 *      Process saving the Designer
 *
 */

add_action( 'woocommerce_product_addons_global_edit_addons', function( $edit_post, $objects) {


    //Save our custom taxonomy selector
    //Use the $_POST variable to grab the values in a clean way that returns integers
    $designer_objects = ! empty( $_POST['addon-objects-product-brand'] ) ? array_map( 'absint', $_POST['addon-objects-product-brand'] ) : array();

    //Save the terms to the product add-on post object
    $result = wp_set_post_terms( $edit_post['ID'], $designer_objects, 'product_brand', false );


}, 10, 2);
Create New Logic for the Frontend
- Expand the list of taxonomies to look for when the plugin loads addons
- Modify the WP Query to include our new taxonomy filter
Filter the terms
We can use the filter the plugin provides to add to the list of terms to refine by when querying for the add-on post object(s).
/**
 *      Add the taxonomy product_brand to the
 *      list of possible ones to look for
 *      when displaying the addon on the front end
 *
 *
 */


add_filter( 'get_product_addons_product_terms', function( $terms, $post_id ) {


    //Add Designer terms
    $designers = wp_get_post_terms( $post_id, 'product_brand', array( 'fields' => 'ids' ) );

    $terms = array_merge( $terms, $designers );


    return $terms;

}, 10, 2 );
Modify WP_Query
Make sure we look for the new taxonomy filter and change the tax_query relation to reduce our results, not expand them.
/**
 *      Modify the query args for getting the
 *      addons posts
 *
 *      We need to change the tax_query to include
 *      the additional taxonomy (product_brand)
 *
 */

add_filter( 'get_product_addons_global_query_args', function( $args, $product_terms ) {


    $cat_terms = [];
    $extra_taxes = [];

    foreach( $product_terms as $term_id ) {

        $term = get_term( $term_id );

        if ( ! is_wp_error( $term ) && ! empty( $term ) && $term->taxonomy !== 'product_cat' ) {

            $extra_taxes[ $term->taxonomy ]['taxonomy'] = $term->taxonomy;
            $extra_taxes[ $term->taxonomy ]['terms'][] = $term_id;

        } else {

            $cat_terms[] = $term_id;
        }

    }


    //We are organizing the terms into proper tax groups

    if ( !empty( $cat_terms ) ) {

        $args['tax_query'][0]['terms'] = $cat_terms;

    }


    if( !empty( $extra_taxes ) ) {

        //Make our relationship AND because we need to reduce our results by the criteria, not expand it.
        $args['tax_query']['relation'] = 'AND';

        foreach ( $extra_taxes as $extra_tax ) {

            $args['tax_query'][] = [
                'taxonomy'  => $extra_tax['taxonomy'],
                'field'     => 'id',
                'terms'     => $extra_tax['terms'],
                'include_children'  => false
            ];

        }


    }


    return $args;

}, 10, 2 );
The New Backend Editor
Here’s a screenshot of what our changes look like on the back end:
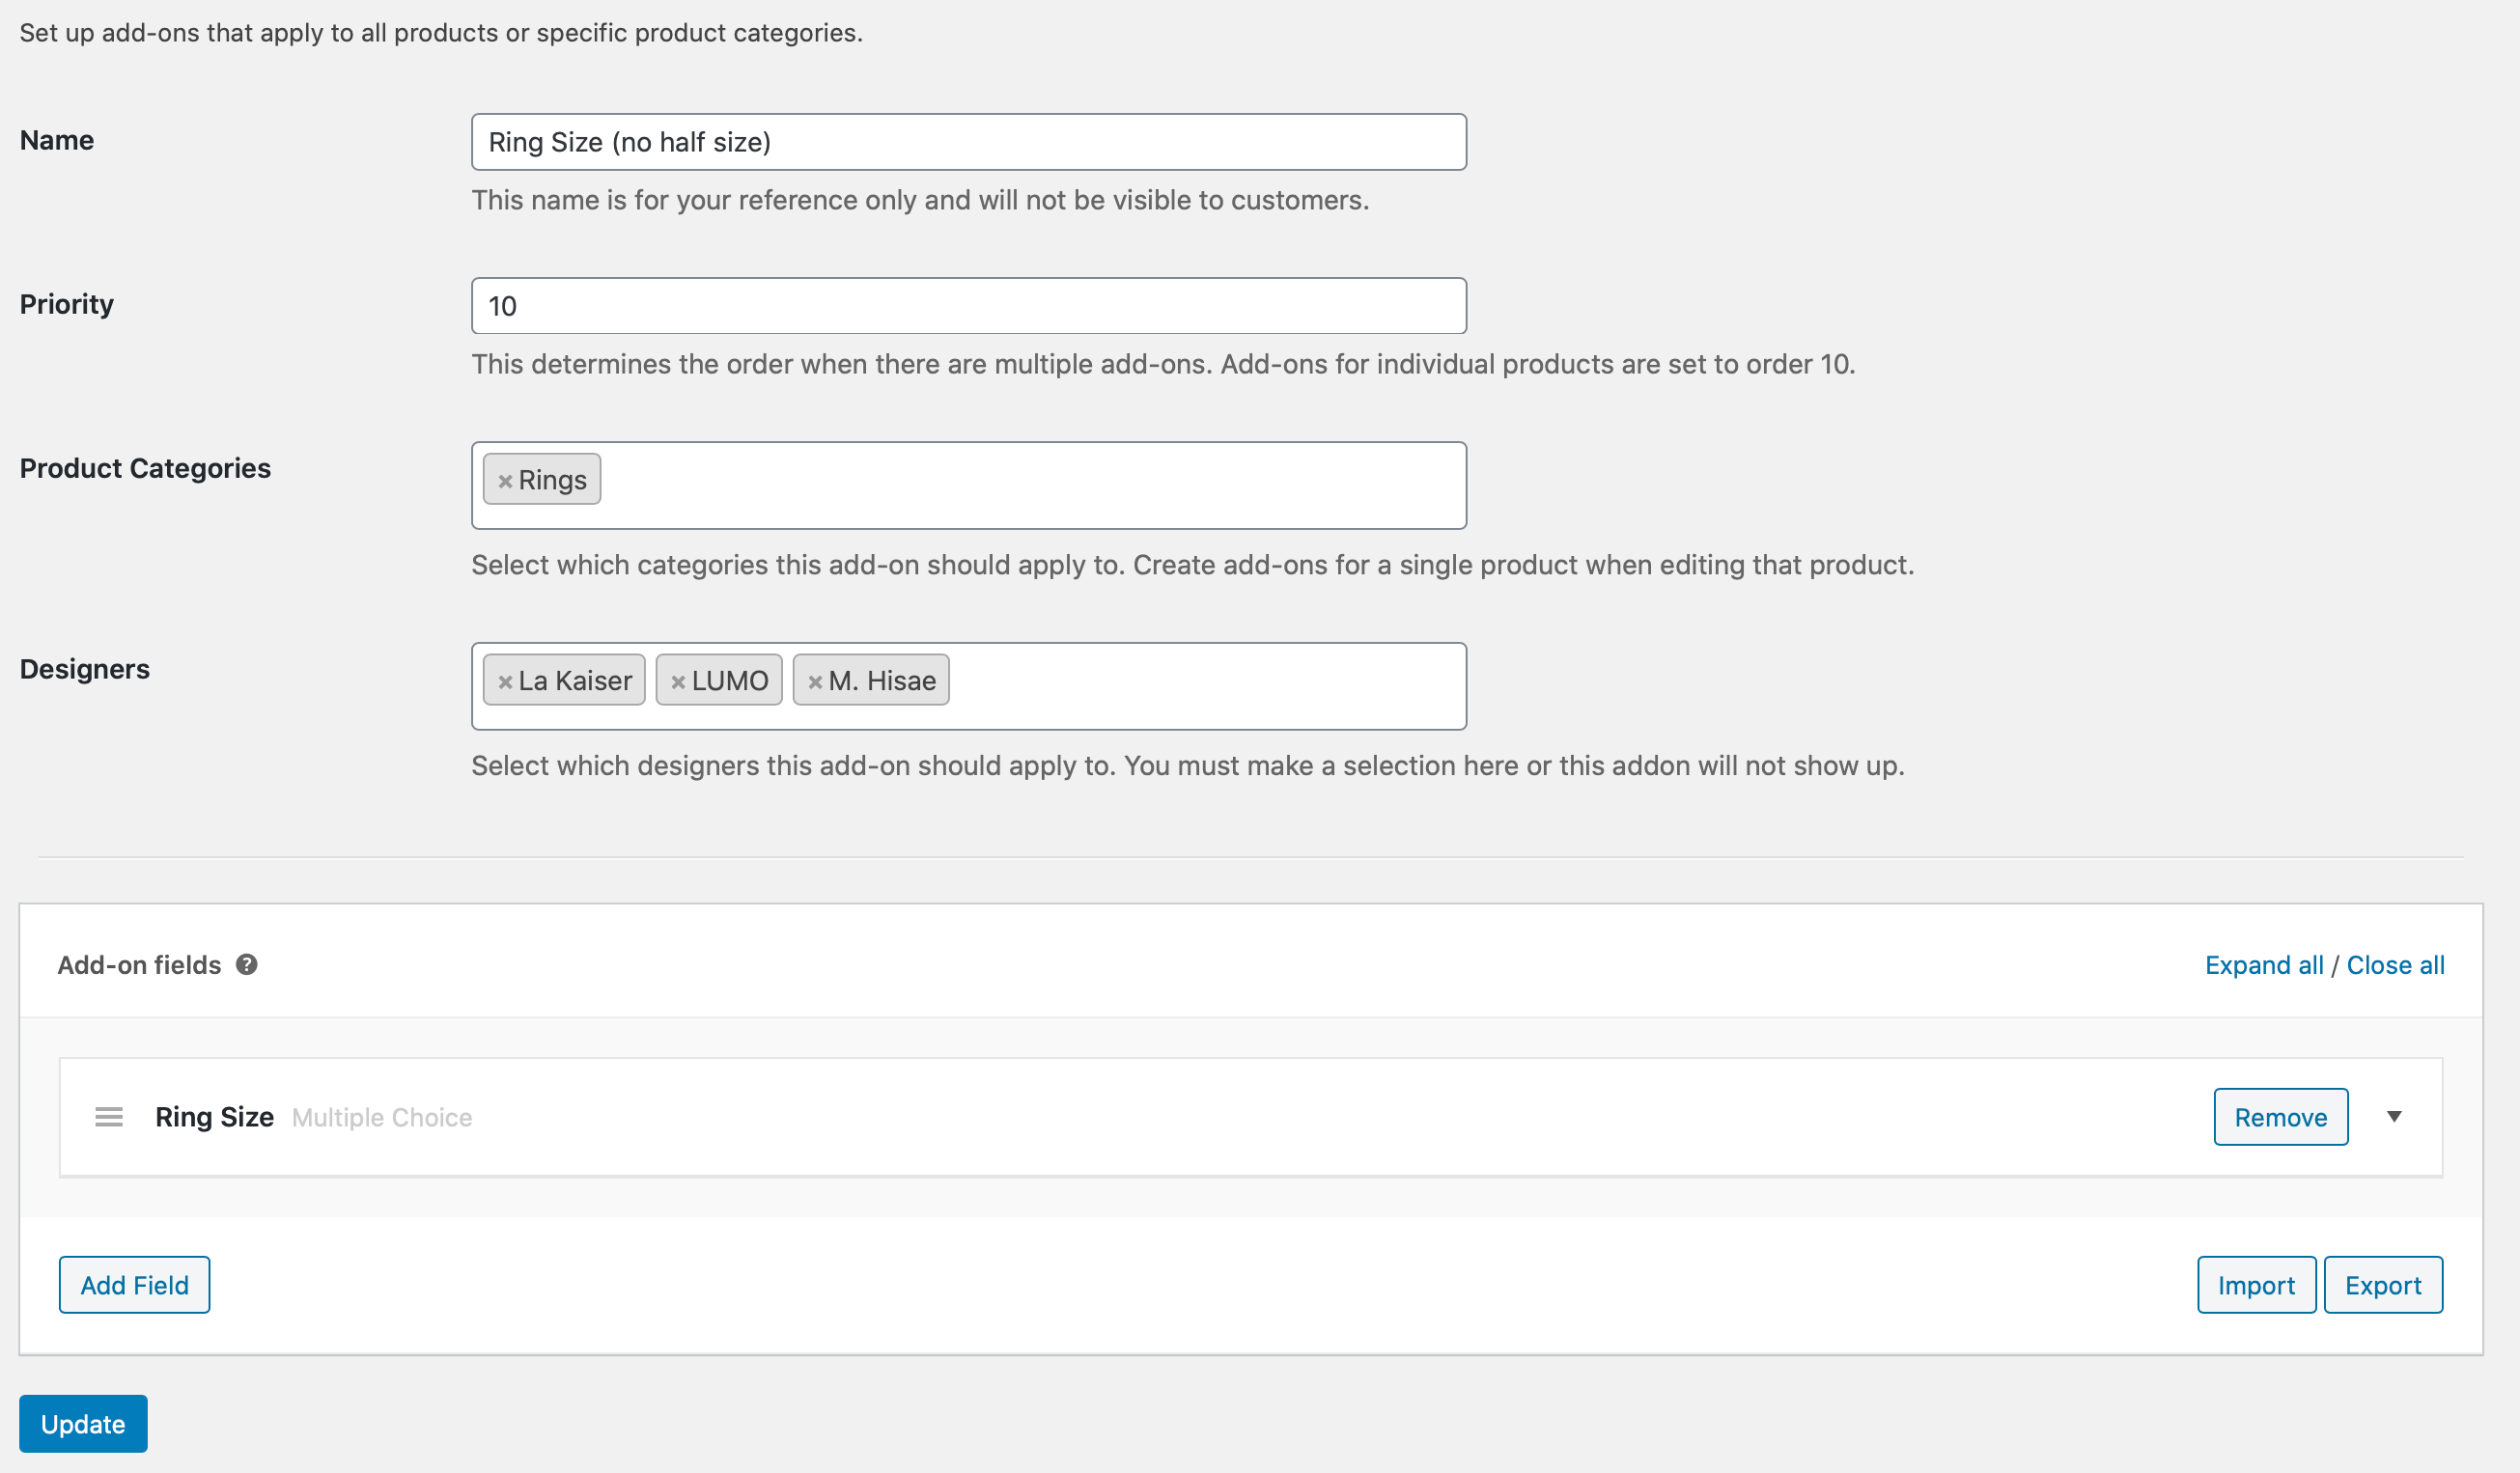
You can see the Designer’s form element is there. Notice the description text underneath is that matches up with our jQuery text edit.
Now you can see the whole sizes on the front end for the designer “La Kaiser“:

I hope this post has helped somebody out there with a similar need. If you have an online store and need this type of help, please feel free to reach out to nic@crearewebsolutions.com.
Frequently Asked Questions
Why did Moondance Jewelry need a custom taxonomy filter for ring sizes?
Moondance Jewelry needed a custom taxonomy filter because their standard WooCommerce setup only filtered product add-ons by category. However, different designers offered different ring size options (whole sizes vs. whole and half sizes). Using a taxonomy filter based on the Designer taxonomy allowed a more tailored and manageable solution.
How does a taxonomy filter improve the shopping experience?
A taxonomy filter enhances the shopping experience by showing customers only the relevant options based on specific attributes like designer, material, or collection. For Moondance Jewelry, the taxonomy filter ensured customers selected the correct ring sizes without confusion, reducing frustration and abandoned carts.
How was the taxonomy filter integrated into WooCommerce Product Add-ons?
The taxonomy filter was integrated by adding a custom field to the add-on editor, initializing a Select2 dropdown for user-friendly selections, saving the selected terms, and modifying the front-end query. This allowed global add-ons to be filtered not just by category but also by designer, using a flexible taxonomy filter system.
Can a taxonomy filter work alongside WooCommerce product categories?
Yes, a taxonomy filter can be configured to work alongside product categories. In our solution, the WP_Query was modified to include both product categories and the custom Designer taxonomy. By using an u0022ANDu0022 relation in the query, we ensured precise filtering so only the appropriate add-ons appeared based on both taxonomies.u003cbru003e
Is it better to modify plugins directly or use taxonomy filters through hooks and actions?
It’s always better to extend functionality using hooks, actions, and filters rather than modifying plugins directly. For Moondance Jewelry, we added the taxonomy filter by tapping into existing WooCommerce Product Add-ons actions and filters, keeping the plugin upgradable and future-proof without overwriting core files.